A plain-language walkthrough of creating a domain email address with Google Workspace, from sign-up and TXT, MX, SPF, DKIM, and DMARC to aliases, admin security, and testing.
Search for how to set up a company email address and you hit a wall of unfamiliar terms at once: TXT, MX, SPF, DKIM. The first time, creating one email address can feel like a server construction project.
The overall flow is simpler than it looks. This guide walks through how someone who already owns a domain creates an address like `contact@example.com` with Google Workspace. `example.com` is a placeholder domain, so read it as your own.
The focus is on why each step exists rather than on memorizing values. Menu names shift a little whenever Google or your domain registrar redesigns its screens, but what you need to check stays the same.
Why bother with a domain email address
A personal Gmail account can send and receive mail just fine. Still, if your website lives at `example.com`, it makes sense for your email to be `contact@example.com` as well.
• Your website, business card, and quotes all carry the same name.
• Recipients can tell which business the message came from.
• You can create addresses that describe the job, such as `contact@`, `order@`, or `invoice@`.
• If you change email providers later, you keep the same address as long as you own the domain.
A domain address does not create trust on its own. A clear name and signature and prompt replies still matter. It does make it much easier for the other side to connect your website and your mail.
Three words to understand first
A domain is your address on the internet, like `example.com`. Buying a domain does not give you email automatically.
Google Workspace is Google's suite for businesses. If personal Gmail is a free mailbox on `@gmail.com`, Workspace is a paid mail service that lets you use your own domain inside the Gmail interface.
DNS is the set of signposts for your domain. It records which server serves the website and which mailbox should receive mail. This whole job comes down to pointing a few of those signposts at Google.
You will move between three places.
• The Google Workspace sign-up screens: where you create the subscription and the admin account
• Your domain provider's DNS management screen: where you enter records such as TXT and MX
• Gmail and the Google Admin console: where you manage mail and security settings
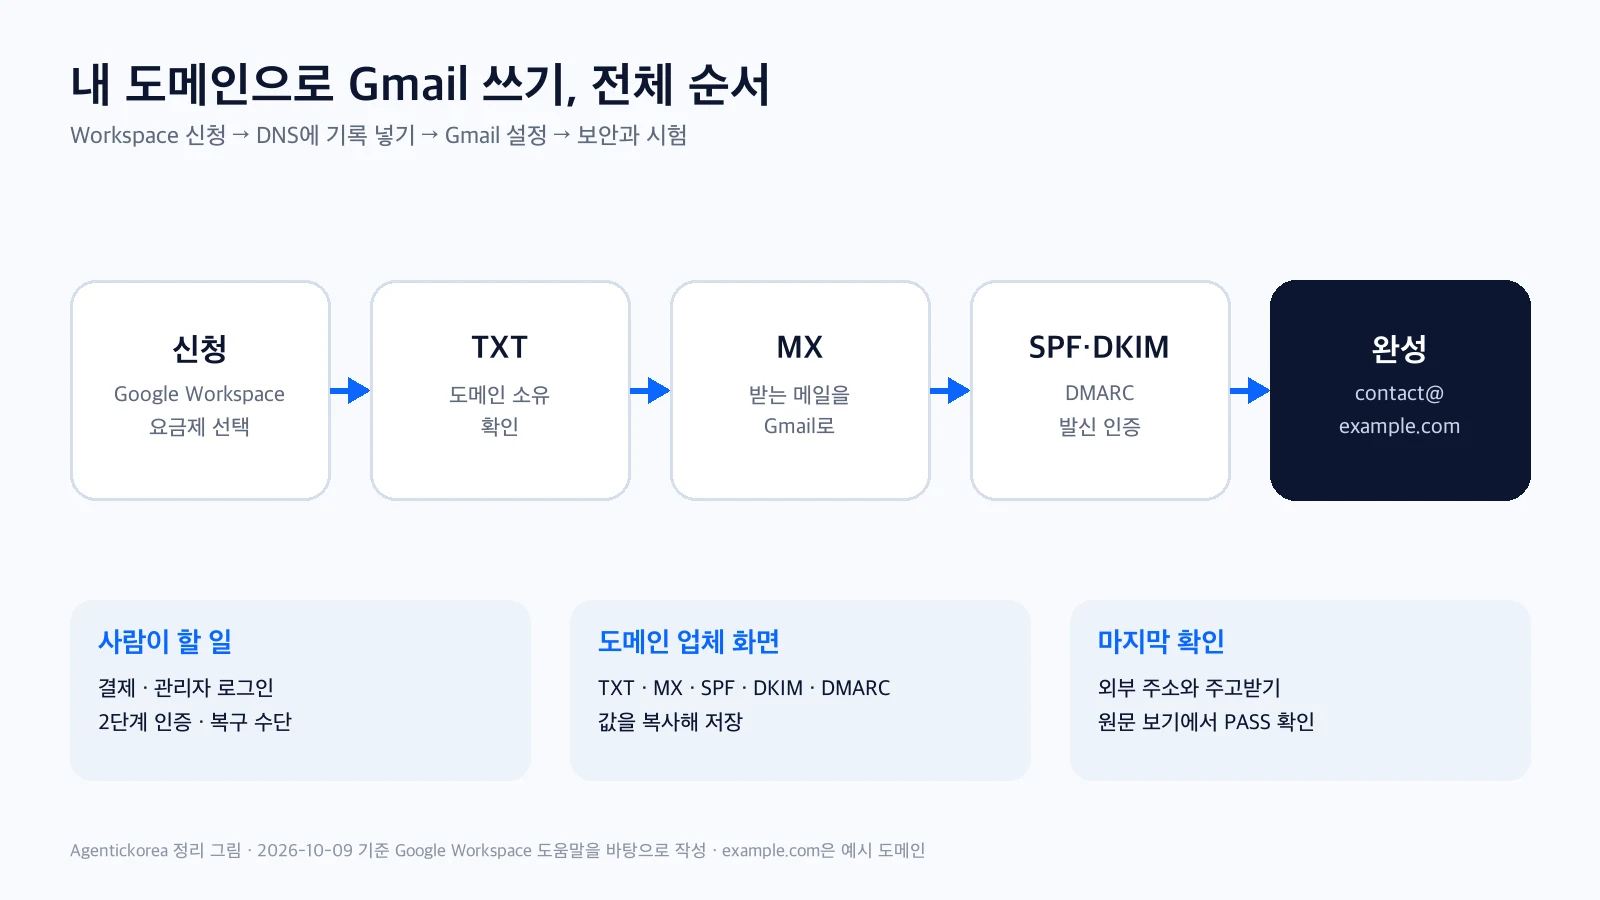
The whole process at a glance
1. Sign up for Google Workspace.
2. Prove the domain is yours with a TXT record.
3. Point the MX record to Google so new mail arrives in Gmail.
4. Send and receive a few test messages.
5. Strengthen outgoing mail with SPF, DKIM, and DMARC.
6. Set up public aliases and the reply-from address.
7. Protect the admin account with 2-Step Verification and recovery options.
TXT and MX alone are enough for mail to flow. For an address you will use for real work over the long term, finishing SPF, DKIM, DMARC, and admin security is the safe choice.
Step 1. Sign up for Google Workspace
Start by comparing plans on the pricing page. On the Korean pricing page checked on Oct 9, 2026, the plans were listed as Starter, Standard, Plus, and Enterprise, with prices in US dollars for one user on an annual plan. If email is your starting point, look at Starter first. Discounts and commitment terms change often, so check the final amount and cancellation terms on the day you sign up rather than relying on the numbers here.
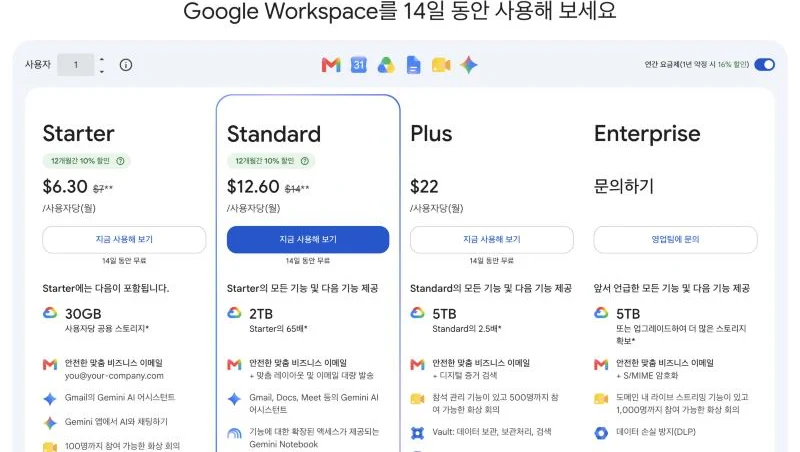
Sign-up begins with the "Get started" button. The first screen asks for your business name, number of employees, and region.
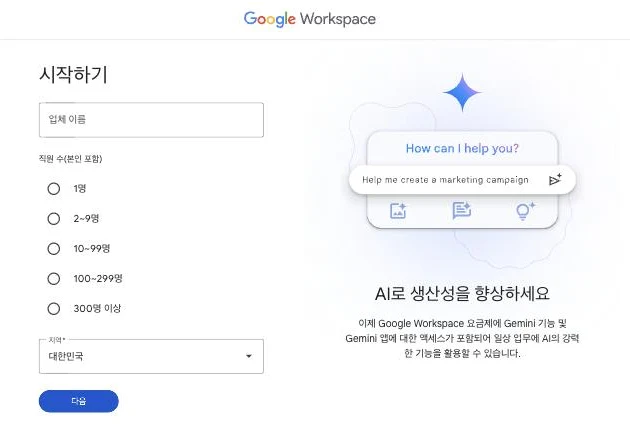
The following screens ask for roughly this:
1. Your name and a contact email address.
2. When asked whether you already have a domain, choose to use your existing domain.
3. Enter only the domain, such as `example.com`, without `https://` or `www`.
4. Create the first user address and password. This first user also becomes the administrator.
An administrator has far more power than a regular user: they can create users, reset passwords, and change domain security. Rather than using `contact@`, which you will publish widely, as the admin login, it is easier to manage a primary account that clearly identifies the real person and add the public address as an alias.
Mail still does not work after sign-up. Google first needs to confirm that the person who signed up really owns the domain.
Step 2. Prove the domain is yours with TXT
A TXT record is a short note stored in DNS. Google gives you a unique line starting with `google-site-verification=`, and you put it in your domain's DNS. When Google finds the note, it concludes that whoever can edit the DNS owns the domain.
1. In the Google Admin console, go to Menu → Account → Domains → Manage domains.
2. Click to verify the domain and copy the value starting with `google-site-verification=`.
3. On your domain provider's DNS screen, choose type TXT, leave the name (host) blank or enter `@`, and paste the whole line as the value.
4. Save, return to the Admin console, and click verify.
The table below shows all five DNS records this guide will add. For now, you only need the first row (TXT ownership check).
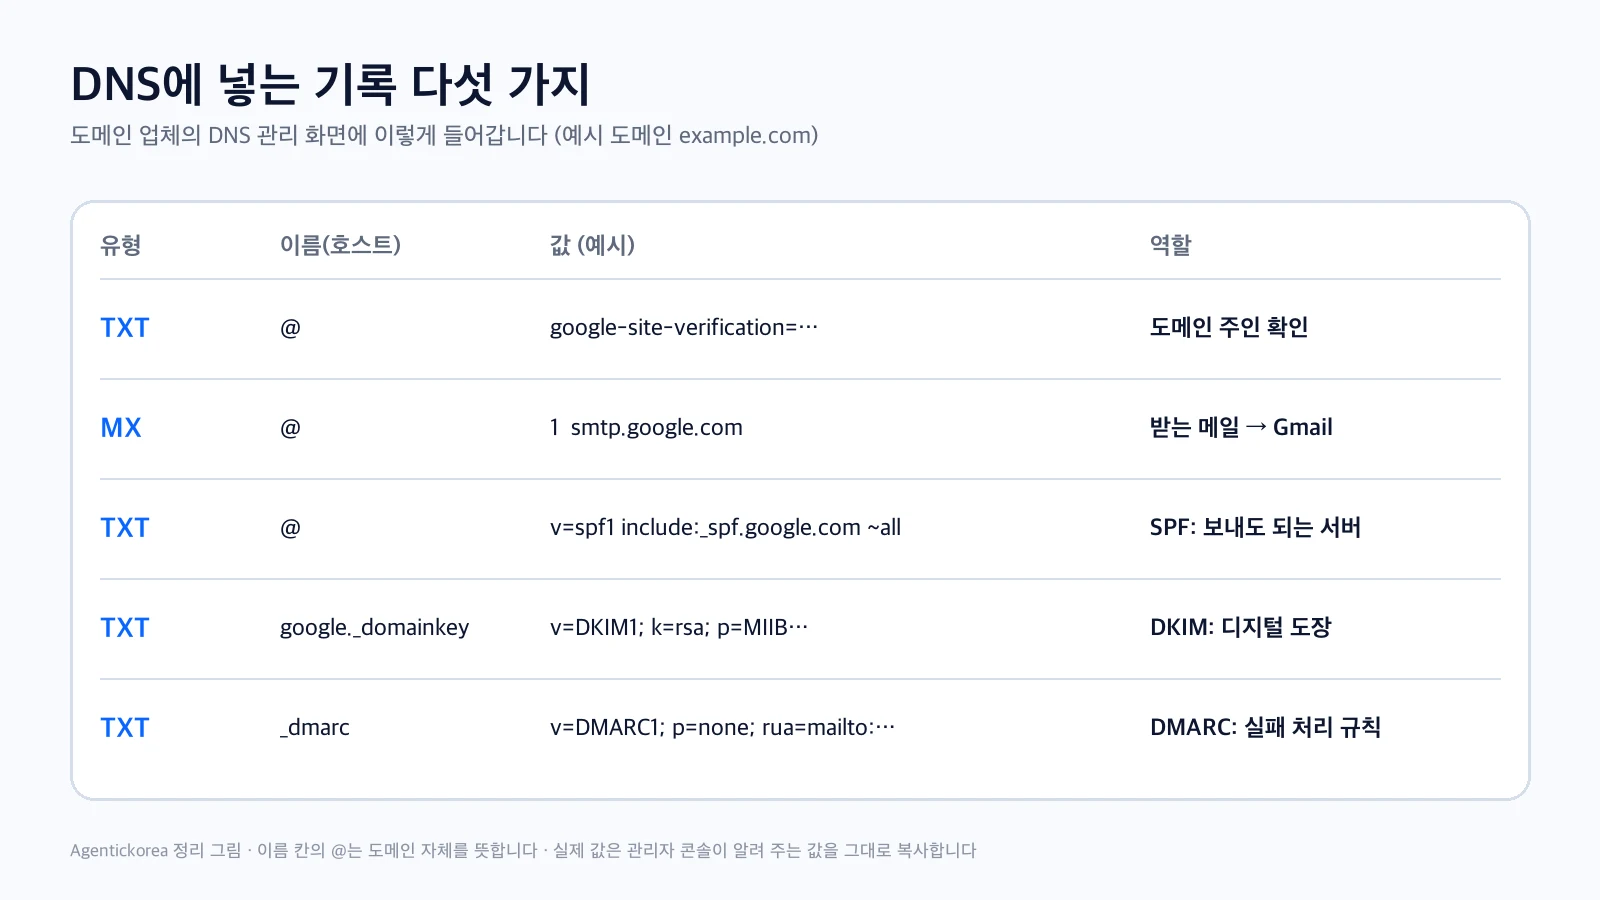
The `@` here is not the at sign from an email address. In DNS it means "the domain itself." Some providers want the name field left blank instead, so follow the on-screen hints.
If verification fails right after saving, do not assume something is broken. DNS changes take time to spread, and Google says it can take up to 72 hours. Instead of adding the same TXT record again and again, first check that no stray spaces slipped into the value and that you edited the DNS where it is actually managed (wherever your name servers point).
Step 3. Point new mail to Gmail with MX
If domain verification is an ID check, MX is the delivery address for your mail. When someone writes to `contact@example.com`, MX tells the internet which mail server should take it.
For new setups, Google gives this MX value:
• Type: MX
• Name (host): blank or `@`
• Priority: `1`
• Value: `smtp.google.com`
• TTL: your provider's default
If your provider requires a trailing dot, enter `smtp.google.com.`. In the Admin console, activate Gmail under Account → Domains → Manage domains.
If you were already using another mail service, such as your web host's mailbox, pause here. The moment MX changes, new mail goes somewhere else, so back up your existing mail and plan the move first. Deleting old MX records blindly and leaving MX records from two different services side by side are both risky.
Step 4. Send a few simple test messages
Once MX is saved, check basic delivery before moving on to security settings.
1. Send a message from an outside address, such as personal Gmail, to your new domain address.
2. Check that it arrives in the Workspace Gmail inbox.
3. Reply from the new domain address to the outside address.
4. Check both the inbox and the spam folder on the other side.
While DNS is spreading, it may work from some places and not others for a while. If it does not work right away, waiting a few hours and testing again is better than changing settings repeatedly.
Mail flowing does not mean you are done. Next you set up sender authentication so receiving mail services can conclude that the message really came from example.com.
Step 5. SPF is the list of approved sending servers
SPF (Sender Policy Framework) publishes a list that says, in effect, "these are the servers allowed to send mail using our domain name."
If you send mail only through Google Workspace, add this value to DNS as a TXT record:
v=spf1 include:_spf.google.com ~all
The key rule is one SPF record per domain. If website notifications, a newsletter tool, and a booking system each add their own SPF line, authentication can break. If a TXT record starting with `v=spf1` already exists, do not create another one. Merge every sending service into that single line.
If you plan to send website notifications as `contact@example.com`, check that this sending path is covered by SPF too. Part 2 covers that.
Step 6. DKIM is a digital seal on every message
DKIM makes Google attach a digital signature to every message you send. It is like sealing an envelope and stamping it to show the contents were not changed on the way.
1. In the Admin console, go to Apps → Google Workspace → Gmail → Authenticate email.
2. Pick your domain and generate a new record.
3. Choose a 2048-bit key if possible and keep the default selector, `google`.
4. Save the host Google shows you (usually `google._domainkey`) and the long TXT value in DNS.
5. After the DNS value has spread, return to the Admin console and click Start authentication.
The selector is just a name that says which DKIM key was used. If this is your first time, keep the default `google`. Right after turning on Gmail, it can take 24 to 72 hours before the key generation option appears.
The step people miss most often is that final Start authentication button. Writing the value into DNS is not enough on its own.
Step 7. DMARC sets the rule for messages that fail
DMARC looks at the SPF and DKIM results and tells receiving services what to do with mail that fails authentication. It can also send you reports on who is sending mail using your domain name.
Starting with `p=reject`, which refuses every failing message, can block legitimate mail you have not registered yet. Watch SPF and DKIM for at least 48 hours, then start with `p=none`, which only observes.
Host: _dmarc
Type: TXT
Value: v=DMARC1; p=none; rua=mailto:dmarc@example.com
`dmarc@example.com` is where reports go. The reports are XML files that are hard to read directly and can arrive in large numbers, so keep them out of your regular inquiry inbox. After watching the results for a week or more and confirming no sending service is missing, consider tightening to `quarantine` and finally `reject`.
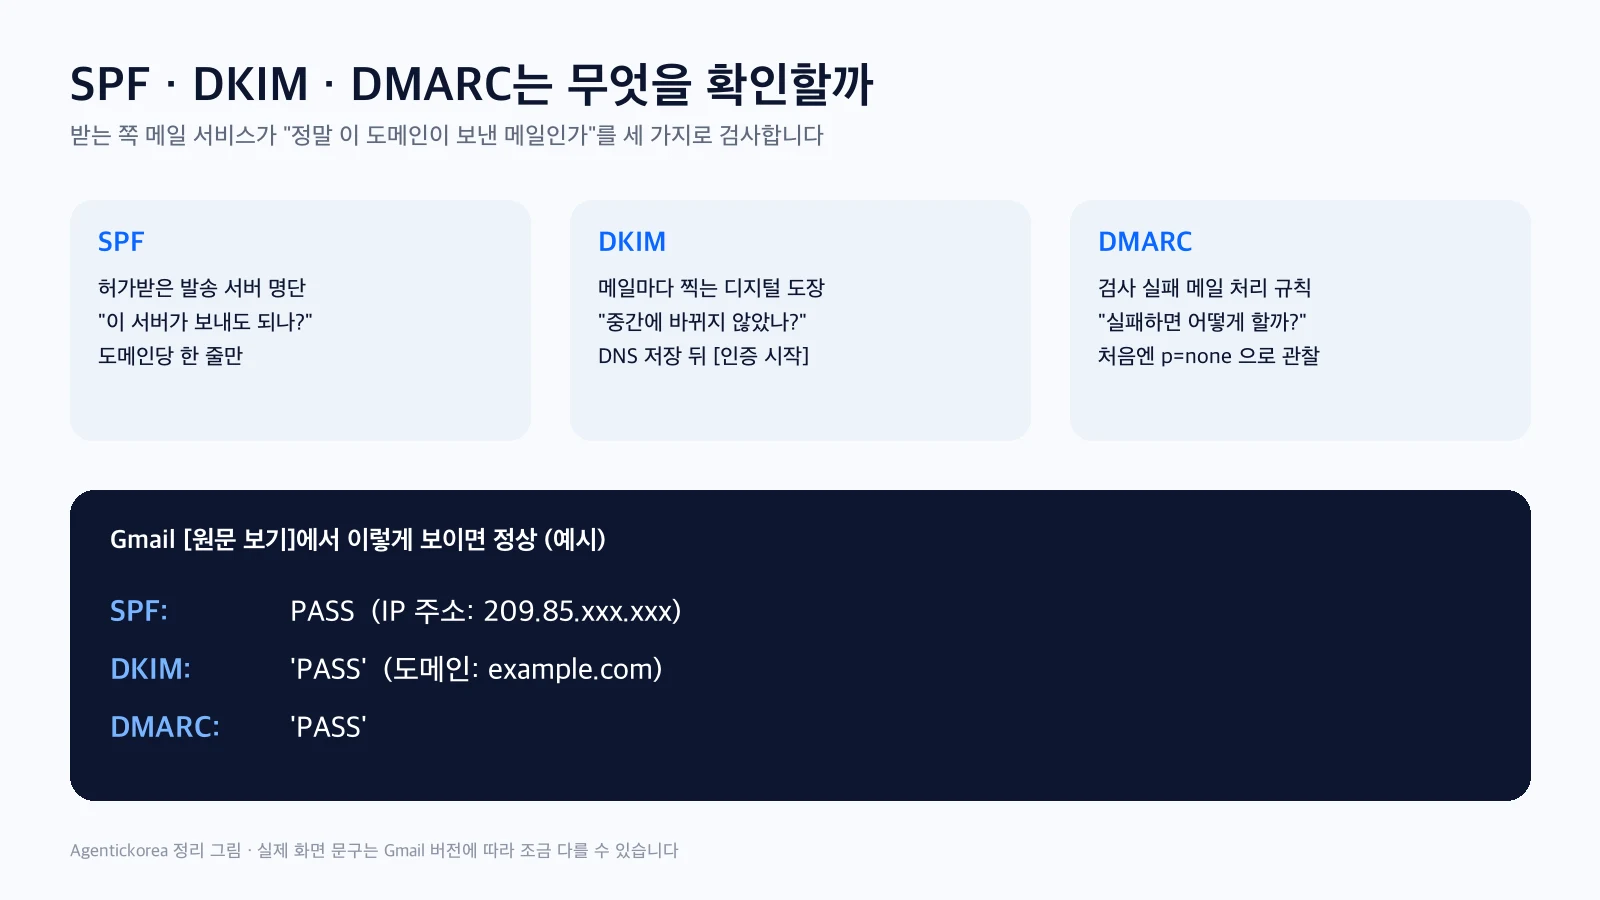
In short: SPF is the approved list, DKIM is the digital seal, and DMARC is the rule for what happens when checks fail. They are not substitutes for each other. They work together.
Step 8. Separate the primary account from public aliases
You may have one login account but want customers to see `contact@`, orders to go to `order@`, and invoices to `invoice@`. You do not need a paid user for each address.
A user is an independent account with its own login, mailbox, and Drive. An alias is an extra address that delivers into the same mailbox. It is like one building with several signs by the front door.
1. In the Admin console, go to Directory → Users and select the primary account.
2. Under alternate email addresses (aliases), add names such as `contact`, `order`, and `invoice`.
3. Send a test message to each alias and confirm it lands in the same inbox.
Google says each user can have up to 30 aliases at no extra cost. Aliases are not separate accounts, though, so you cannot sign in with them or give them their own Drive. If several people need to handle the same address, do not share a password. Look at Google Groups, a collaborative inbox, or delegated access instead.
Step 9. Make Gmail reply from the alias address
Even when mail arrives at an alias, your reply may go out from the primary address. A customer who wrote to `contact@example.com` and gets a reply from an unfamiliar personal address may be confused.
1. In Gmail on a computer, go to Settings → See all settings.
2. Open the Accounts tab.
3. Under "Send mail as," add the alias.
4. Check that you can pick `contact@example.com` in the From line of a new message.
5. On the same screen, choose "Reply from the same address the message was sent to."
Step 10. Guard the admin account like your front door key
If the admin account is taken over, the damage is not one message. Users, passwords, and security settings can all be changed.
• Always turn on 2-Step Verification, which adds a second check after the password through a phone prompt, an authenticator app, or a security key.
• Do not rely on text messages alone. Keep backup codes offline.
• Use an outside address, not one on the same Workspace domain, as the recovery email, so you can still receive it if the whole domain has a problem.
• Confirm which address receives domain renewal and Workspace payment failure notices.
• In a team, avoid a situation where only one person knows every recovery method, and write the procedure down.
Once mail is working, this step is easy to put off, but it is best finished before real work begins.
Step 11. Run the final tests from a different address
Testing only inside the account you configured misses problems. Use a completely different address, such as personal Gmail or another company's mail, to check the following.
• Do messages sent to the primary address and every public alias arrive?
• Does mail sent from the domain address to the outside land in the inbox rather than spam?
• When you reply to an inquiry that came in through an alias, does the From line show the same alias?
• Does the same mailbox open in Gmail on both a computer and a phone?
• Do you get a bounce notice when you send to an address that does not exist?
• In the receiving Gmail, under the menu (⋮) → Show original, do SPF, DKIM, and DMARC show PASS?
• Can you actually use 2-Step Verification, the recovery email, and the backup codes?
Can website inquiries come in to this address too
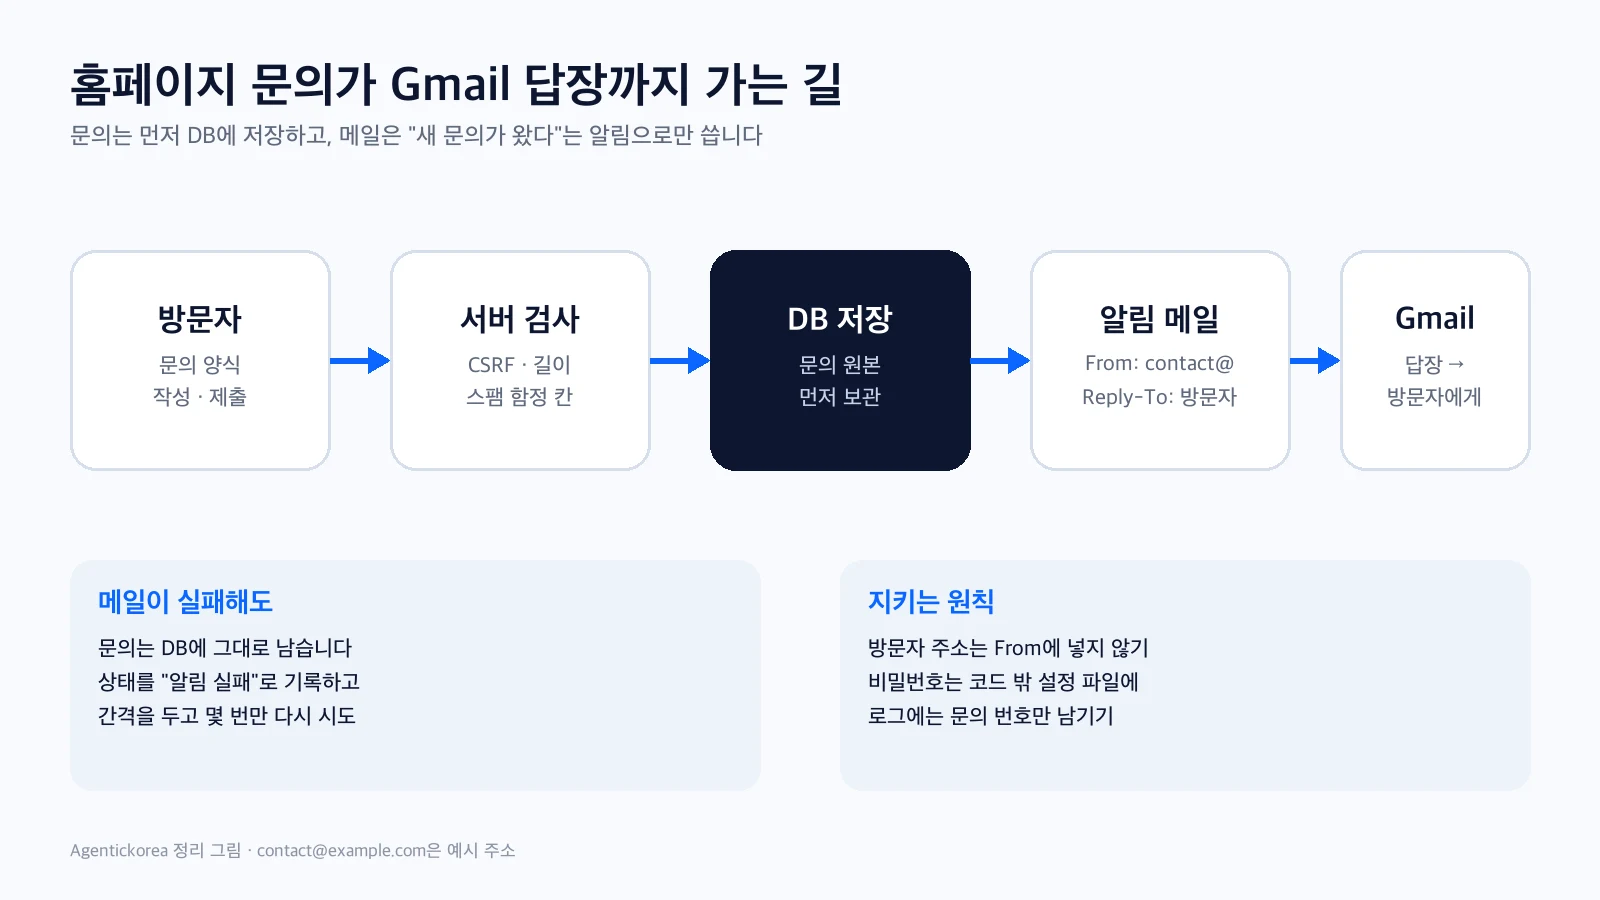
Yes. Do not use the address a visitor typed into the form as the sender (`From`), though. That makes your web server look as if it is sending mail while pretending to be the visitor, and the message can fail SPF and DMARC checks.
A safe basic flow looks like this:
1. Save the inquiry in the website database first.
2. The server sends a new-inquiry notification using the authenticated `contact@example.com` as the sender.
3. The visitor's email goes in `Reply-To`, the address that receives replies.
4. When the administrator clicks Reply in Gmail, the reply goes straight to the visitor.
Since May 1, 2025, Google Workspace no longer supports less secure apps that sign in with only a username and password. So writing a Workspace password into a PHP file is not an option. Part 2 covers saving inquiries, choosing a sending method, spam protection, failure logs, and retries, with PHP examples.
Where people commonly get stuck
• I bought a domain but have no email: a domain and a mail service are separate. You need to sign up for a mail service such as Workspace.
• TXT verification keeps failing: check that you edited the DNS where your current name servers point, not just wherever you bought the domain.
• Old mail stopped arriving after changing MX: you may have changed the destination before backing up and moving your existing mail.
• Mail goes out but lands in spam: check SPF, DKIM, and DMARC together with the sender name, content, and domain reputation.
• There are two SPF records: do not add another one. Merge them into a single SPF record.
• DKIM fails even though the value is in DNS: check that you clicked Start authentication in the Admin console.
• I cannot sign in with an alias: an alias is just an extra address, not a separate user.
• Mail arrives at an alias but replies go out from the primary address: check Gmail's "Send mail as" setting and the default reply address.
• Only the website notifications fail authentication: do not put the visitor's address in `From`. Put your domain address in `From` and the visitor's address in `Reply-To`.
When is the basic setup finished
• You can send and receive mail with outside addresses.
• You can receive on public aliases and reply from the same address.
• SPF and DKIM pass, and DMARC has started with an observe-only policy (`p=none`).
• The admin account has 2-Step Verification, an outside recovery email, and backup codes.
• You have backed up any existing mail and confirmed the billing and domain renewal notices.
At that point the basic setup is done. TXT is the ownership note, MX is the signpost for incoming mail, SPF is the approved sender list, DKIM is the digital seal, and DMARC is the rule for failures.
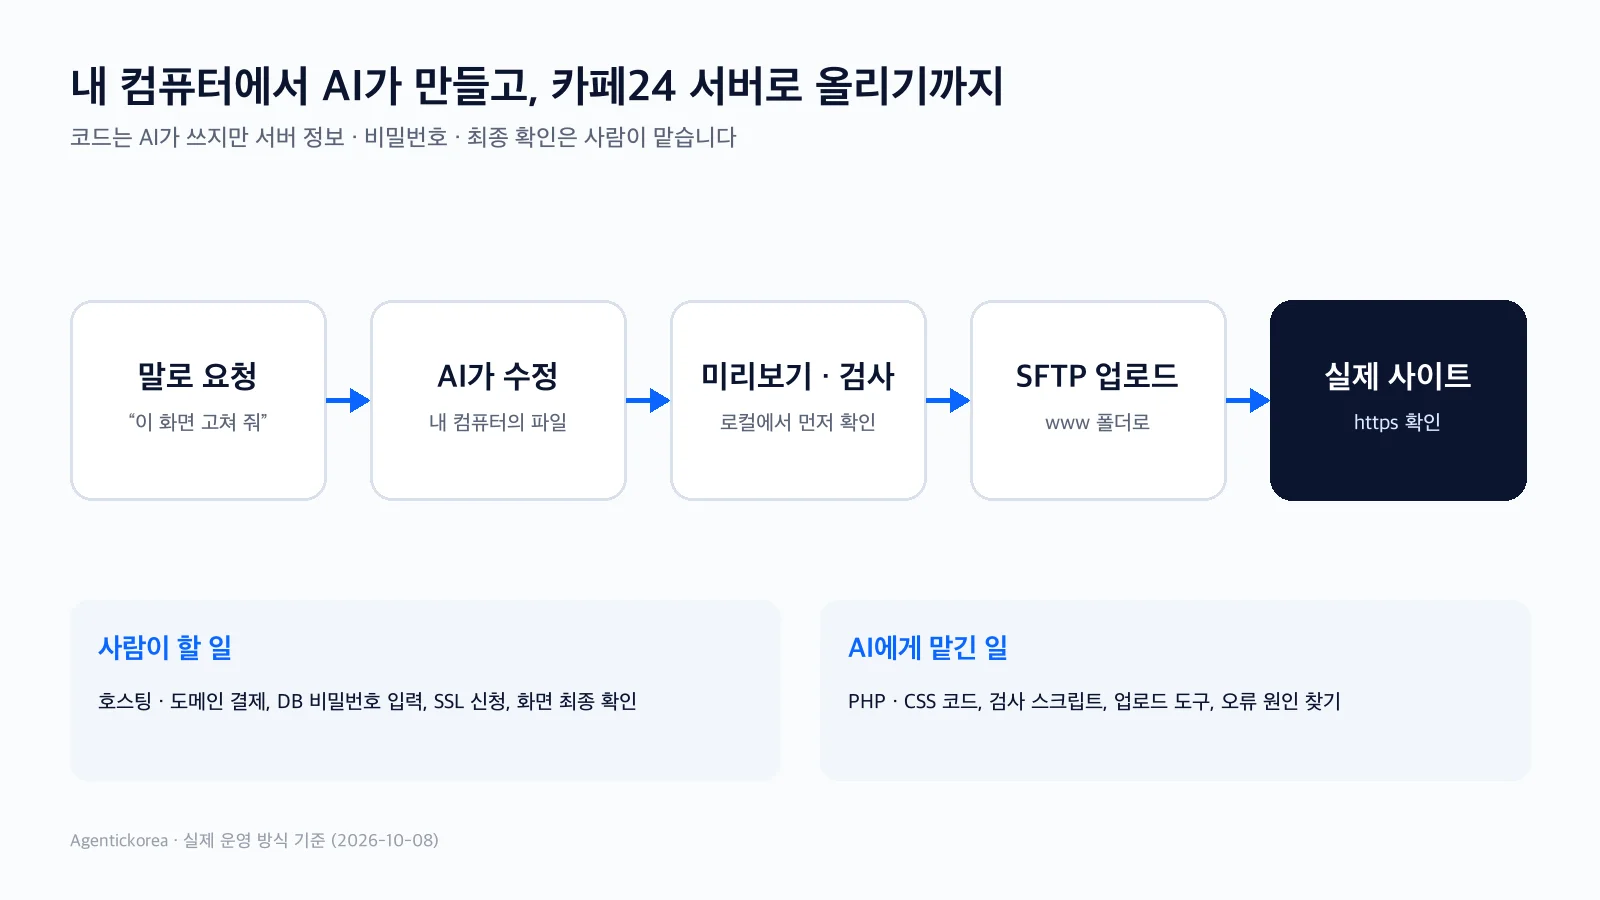
Part 2 continues with PHP examples: saving website inquiries safely in a database, notifying `contact@` about new ones, and replying to visitors directly from Gmail. If all these steps feel like a lot, start with Part 3, which puts everything on one page and includes example requests for AI.
Information is current as of Oct 9, 2026. Google Workspace pricing, menu names, and authentication policies can change, so check the Admin console help pages again when you actually set things up.
Sources
Google Workspace 탄력 요금제와 연간 약정 비교 ↗